GBS-8200
Latest Update (18 Apr. 14):
- Added a video showing High-res interlaced mode
- Warning about the eBay seller, selling the GBS in a box – the items draws more power than the specs of the Amiga recommends
So my RGB to VGA converter arrived. I’ll write up on how to connect a VGA monitor to the Amiga.
Requiremens:
- 23 Pin D-SUB Female (preferable with a casing)
- Solder iron + solder
- 5V / 2A DC adapter. These can be aquired from ebay.
- Some wire if you want the item to be further from the Amiga.
- And the “RGB to VGA converter” (search sentence in quotes used for ebay)
Difficulty: Easy
- Simple solder skills are required
Click on the images below for larger pictures
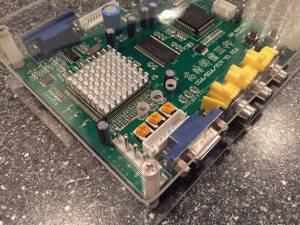
GBS 8200 with RGB wire
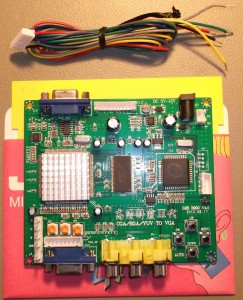
The item as aquired. It came with 2 sets of wires. One set for power (upper right corner of the pcb) and a set for video. A 5 1/4″ floppy has been placed behind it for reference of size.
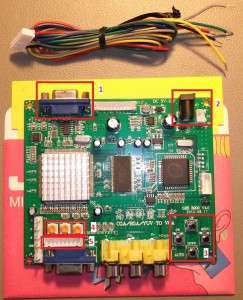 I’ve marked the 5 locations on the PCB that have interest for us.
- VGA output (connect the VGA monitor to this)
- 5V / 2A power input. The cable that comes with the converter can be plugged into the white socket.
- Menu buttons, change output resolution, adjust vertical/horizontal position etc. Change input source / auto detect input.
- B, G, R signal strength. Mine is set to max for all 3.
- RGB input from the amiga, using the cable shown on top of the picture.
The cable that came with my converter was properly colour coded, the RGB was proper red, green and blue, and gnd is black.
For this setup the V-Sync (yellow cable) is not needed.
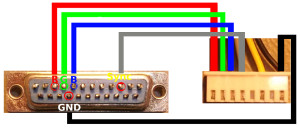
23 pin connected to cable
On the picture above you can see how the cable needs to be connected to the solder side of the 23 Pin D-Sub female connector. Connect the finished wire to (5) and the amiga. Power on everything and you’re good to go.
Finished picture.
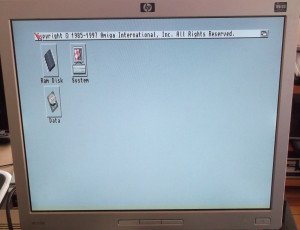
UPDATE: I made a movie for 640×512 (high-res interlaced) to show how it looks like
This converter has a menu which came in Chinese. This can be changed in the menu, step one up, and select English.
The rest of the menu speaks for itself. The settings I adjusted was Horizontal/Vertical stretch, and Positioning. Also changed from 640×480 to 1024×768 for the output resolution.
I must confess that the image output is really great compared to the price.
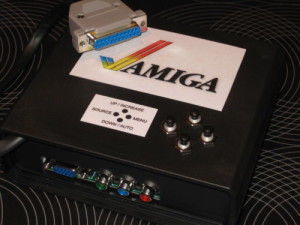
Update (2014-10-22): Henrik Christensen made a nice box, see below
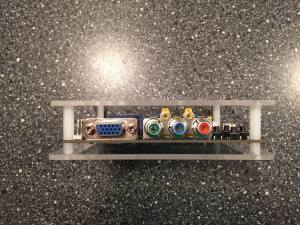
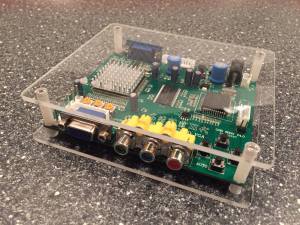
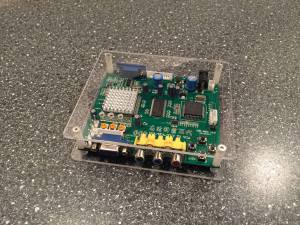
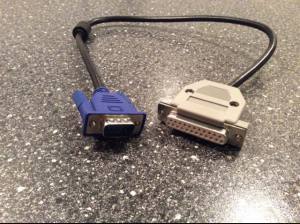 Why make a RGB cable when you can take an old RGB one and just solder one connector? Much better solution than creating a cable from scratch isn’t it?
Word of warning: Someone is selling this packed in a nice box on ebay, I don’t agree with the high price for the box, and if you are going to get it shipped, you might as well pick up the Indivision or ScanJuggler.
EDIT: I must recommend against this as it can burn/kill your amiga. the 5V power or the 12V powerline given by the Amiga is only 100mA, whereas the GBS draws around 300-350mA @ 5V, I haven’t checked how much it draws at 12V, this I have to test ofc.
This last item -sold on eBay- draws power from the output port of the Amiga, which output current only is designed for 100mA, this item draws 3x more current than what the Amiga is designed for, therefore it can destroy your amiga if you use this. The one without a box use an external power supply and doesn’t have this problem.
I originally wrote this article for the CiA website.
A PDF manual of the GBS-8200 can be found here

I tried making a VGA 15-pin – 23-pin Amiga cable up, but have had trouble with the pinouts and getting no signal. What pinouts did you use? The breakout cable with the Gonbes works fine, so it has to be a cable issue.
Hello. I found this nice picture http://www.blogcdn.com/www.engadget.com/media/2006/11/vga_pinout.jpg you just connect red to red, blue to blue etc. the sync is connected to v-sync, and of course you need a ground. Any of the GND pins will do. I’ll update the post soon to reflect your question with a nice drawing 🙂
Ah OK, I think I was missing the ground pin as I wasn’t sure which to use. I’ll give it another go. Thanks! 🙂
That explains it 🙂 let me know how it goes (I’ve found a cable which I’m going to use for the update. So I’ll update the post during this weekend.
Shall do. I decided to pick up a 15-pin connector and make up a whole cable myself, rather than butchering an existing VGA cable, as the wires in that are so thin they’re very tricky to work with. I’ll also make up a new 23-pin connector as I’m cutting down a 25-pin connector and do a much neater job of it. I’ll try and take some photos too.
OK, no Photos as my soldering skills are atrocious lately (I’m out of practice). But, I’ve successfully made up the cable. I used pin 10 to connect the Ground pin to, and it’s working VERY well. I was getting sparklies on the wiring loom, but not so this way. Plus the picture is very stable. I found some 8-core ‘video’ cable which is lightly shielded and that seems to be working fantastically. Also, that image you linked is back to front, based on what it says. Thanks for the help and the VERY useful blog article! 🙂
Does the output signal from the Amiga RGB port need to be 31kHz if using the VGA input on the board? Or does the VGA input also work with 15kHz?
I’m not sure what you’re asking, but the converter converts from 15KHz RGB to 31KHz RGB (VGA). So you can use a VGA monitor with the Amiga.
Well, to put it simply: Does the convertor accept 15kHz signal on the VGA input or do you need to use the 8-pin RGBS header?
That may not be clear, but one of the last images shows a 23pin RGB to 15 pin VGA cable, which is being used as input. So the answer to your question is yes 🙂
Are you using RGBHV with the VGA input?
I’ve heard that it only accepts 31khz on the VGA connector using RGBHV.
thanks.
How much is cheep, and how much is too much? You did not say how much it cost you.
The prices go down all the time. But compared to the indivision which cost roughly €150, the price is much lower than that. I don’t remember how much I paid for this one.
Too much is only up to you how much you are willing to pay. The framemeister is around $368 but gives a really nice picture if it’s worth that amount of money, it’s not too much.
I was wondering if this board could also be used for the c128,
with the right hack it should be possible. take a look here
https://sites.google.com/site/h2obsession/CBM/C128/rgbi-to-scart
I haven’t tried it myself though, but I’m interested in hearing your conclusions.
According to https://ianstedman.wordpress.com/gbs-82xx-experiments/ the GBS 8200 is waiting for a 3.6V maximum sync signal when the CSYNC output of the amiga is 5V.
This leads the board to activate the ESD protection diodes on each synch pulse.
He uses a 680 ohms resistance to lower the tension of the CSYNC signal :
Her is his pinout to pinout table :
Amiga signal Amiga pin Wire GBS marking
Red Video 3 Red R
Green Video 4 Green G
Blue Video 5 Blue B
Ground 16 Black GND
CSYNC 10 Yellow S (via 680 ohm resistor)
Amazing job greetings from Argentina, I bought a 15hz capable monitor my cuestion would be, if I connect this 23 pin to 15pin diagram, will it work??? do I need any extra capacitors? sorry for my english! lets wait till i recieve my monitor and probably upload some pics its a dell E1914H
If your monitor is capable of displaying 15KHz, then it eliminates the use of the RGB to VGA converter, so you should be good without this.
I know about the RGB board i wont need it but the cable from 23pin to 15 vga Pin I need it, so my question would be If I connect the pins the same way If it would work, I think this is more what i need http://eab.abime.net/attachment.php?attachmentid=16650&d=1211448710
yes, that’s all what you need.
you can also buy a premade adapter like this one.
http://amigakit.leamancomputing.com/catalog/product_info.php?products_id=183
Hi I have a have a HD dth set – top box which output is HDMI and component (y,pb,pr,) HD but I want use only by component to vga monitor (15 pin).
Is it possible by your device.
I haven’t testet component signal to vga on the GBS-82×0, but specs says it will, so I’d guess yes.
Hi. I tried this, as I have several of the GBS’ lying around for other purposes. I get a lot of noise in the picture – do you have any idea what could cause this?
Thanks!
Nicholas
you might get some white snow, I found on some GBS’es that when you adjust some of the features like size and go below the 90% of max setting it can help a little.
Ian Steadman ran into problems as well, this might help you if the above doesn’t:
https://ianstedman.wordpress.com/gbs-82xx-experiments/
Hi, you wrote:
“EDIT: I must recommend against this as it can burn/kill your amiga. the 5V power or the 12V powerline given by the Amiga is only 100mA, whereas the GBS draws around 300-350mA @ 5V, I haven’t checked how much it draws at 12V, this I have to test ofc.”
What you say here is that GBS 8200 can kill the Amiga 500?
What I’m saying is that the GBS-82xx draws much more power from the Amiga, than the Amiga was designed to if you power the GBS-82xx from the Amiga. The current it draws is 3x more than what the specs of the port says. This is if you power the GBS-82xx from the RGB port. NOT if the GBS-82xx is externally powered, then it’s safe to use.
The last picture shows a normal VGA cable that you cut on one side and solder a RGB connector? Do you use the VGA connector under the RGB input (5 on your picture) for the input signal on the GBS-8200? If so, is the cabeling identical to the usual RGB-VGA Adapters (like this one: http://amigakit.leamancomputing.com/catalog/product_info.php?products_id=183)?
The reason why I’m asking: I have such an adapter and I’m wondering if it works, if I connect a simple VGA cable between the RGB->VGA Adapter and the GBS-8200 Input VGA (so that no soldering is needed).
Thats correct, that cable is cabled directly, but with no additional components inside (i.e. no buffers like some of those adapters has).
You should be able to use your adapter and a standard VGA cable for the GBS.